
Cardboard car! Ready to embark on an exciting and imaginative journey? Buckle up and join us as we guide you through the exhilarating process of crafting your very own cardboard car from scratch! With our comprehensive, step-by-step tutorial, you’ll have all the know-how to go from collecting materials to adding those final eye-catching details. So let’s rev up our engines, unleash our creativity, and start assembling the cardboard ride of our dreams!
Benefits of Building a Cardboard Car
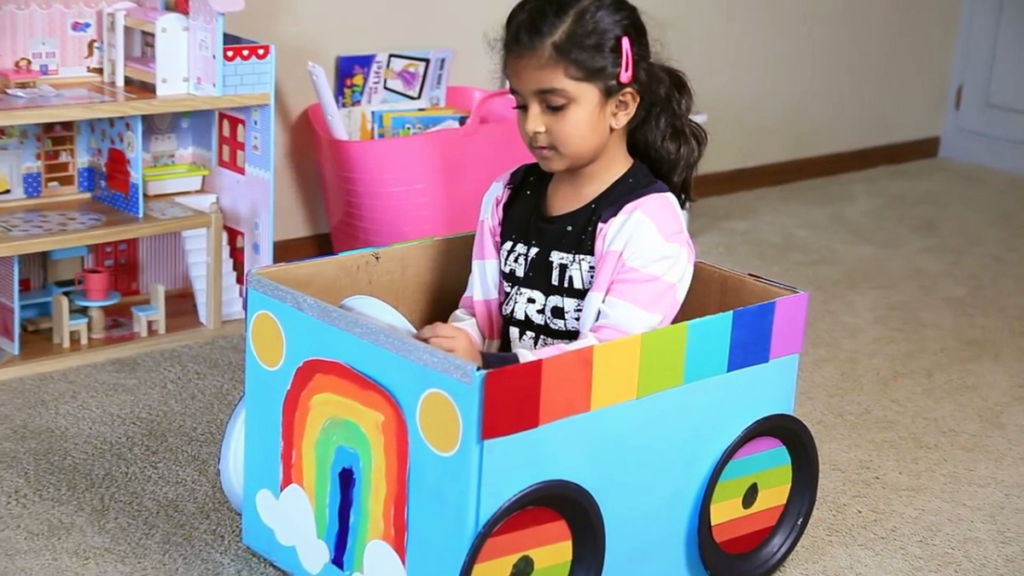
Get ready to ignite your child’s imagination and channel their inner eco-warrior by crafting an epic cardboard car! This affordable and sturdy material allows kids to design their own ride, whether they want to drive, hitch a ride or pull it along. Aside from the countless hours of fun and learning, these eco-friendly creations will have your little ones think twice before using paper products. So, buckle up and hit the road to a greener future!
Step-by-Step Guide for How to Make a Cardboard Car
Gather the necessary materials for your cardboard car
To make your cardboard car, you will need:
Unleash your inner artist and get ready to embark on a whimsical journey of crafting! Prepare your space with essentials like cardboard, scissors, glue, and your favorite colors of paint. Remember, it’s all about precision – so don’t forget your trusty ruler and tape measure. Plywood, a circular saw, and a stapler will elevate your masterpiece to new heights. Finishing touches like stickers and string add that wow factor. Now, let the creativity flow!
Step-by-step guide
- Let’s dive into the world of cardboard crafting! First, unleash your creativity and slice that cardboard into an amazing shape. For precision, grab a ruler or straight edge and let’s get those cuts on point! And remember, the thinner the cardboard, the easier – and more fun – the cutting process will be. Let’s get started!
- Now comes the fun part! Unleash your inner artist and give that cardboard car a makeover with paint or any other exciting medium. Just make sure it’s completely dry before zooming on to the next step.
- Now, grab your trusty scissors and skillfully snip out those magnificent designs adorning your cardboard canvas. Precision is key – you’ll want these beauties to pop out effortlessly when it’s time for their grand reveal!
- Get ready to unleash your creativity with pipe cleaners! Craft symmetrical shapes of your choice on the cardboard, ensuring a well-balanced and visually appealing final car design.
- Get ready to create a sturdy masterpiece! With powerful glue by your side, securely bond those pipe cleaners to the cardboard foundation, ensuring they stay put for the excitement that lies ahead.
- Unleash your inner artist and achieve cardboard car designing perfection with the help of a trusty ruler or straight edge! Effortlessly create that flawless, evenly spaced shapes, while ensuring a consistent distance throughout the car’s anatomy. Cars have never looked this good on cardboard!
- At last, grab your trusty craft knife and skillfully slice those pipe cleaners into petite bits, achieving the ultimate aesthetic for your spectacular cardboard car!
Draw and cut out the cardboard car shape
Unleash your inner artist and create an incredible cardboard car! Begin by sketching a captivating car shape on a grand sheet of paper, and stylishly cut it out. Make sure the front and back are equal in size, while the car’s width is about twice the length, and its height mirrors the width. Add some zest by giving the front and back a curvy touch, with the front’s curve slightly smaller than the back’s. For extra pizzazz, avoid plain straight edges and, instead, connect the front and the back with a sleek 1-inch wide cardboard strip. Get ready to wow everyone with your cardboard masterpiece!
Connect the pieces to make the frame
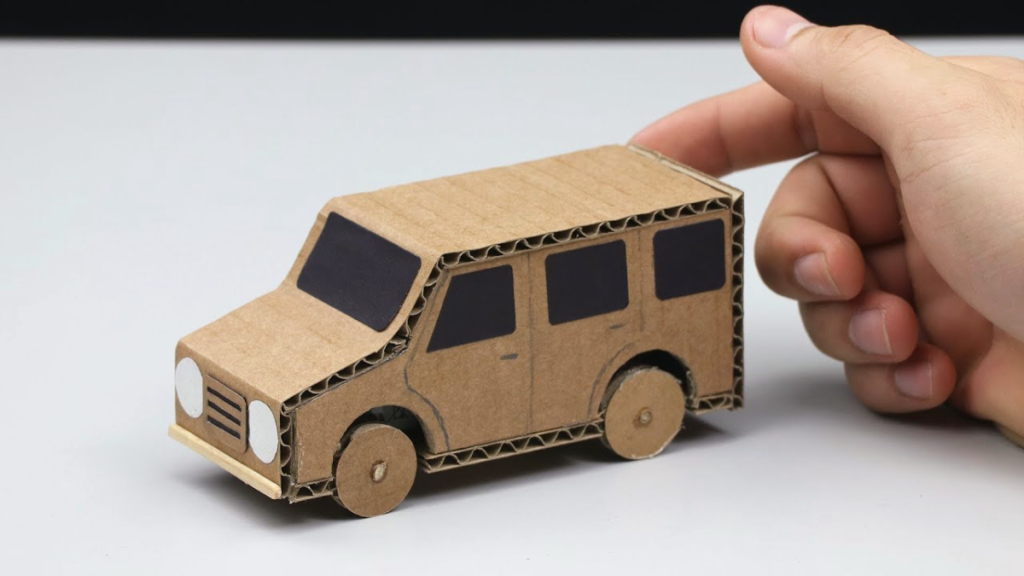
Feast your eyes on this incredible cardboard car! It’s crafted from four key components: a stylish front and back, sleek left and right side panels, and a sturdy roof. Assemble the dashing frame by uniting those side panels and roof, securing the fashionable front and back to their respective positions – and voilà! You’ve got a fantastic cardboard speedster, flaunting its left and right sides with flair.
Add axles
Behold the intriguing cardboard car! Featuring a front and rear axle, this marvel of engineering zips smoothly in both forward and reverse directions – though turning remains an elusive skill yet to be mastered.
Attach the wheels
Experience the thrill of the cardboard cruiser, a dainty four-wheeled contraption that boasts an utterly unique design! Each wheel, crafted from the finest cardboard, adds to the vehicle’s enchanting instability, guaranteeing you the most exhilarating non-mobile adventure of a lifetime.
Finishing the Cardboard Car
Add steering wheel
Discover the ingenuity of cardboard cars with their brilliantly designed steering wheels! Crafted from lightweight cardboard, these easily removable wheels allow hassle-free transportation and agile control. Get ready to grip and zip around with style and ease!
Give your car a paint job
Breathing new life into my plain cardboard car, I unleashed my inner artist with striking black and green paint pens! I adorned its sides and roof with sleek stripes and fiercely painted flames on its front and back. The transformed car left me absolutely thrilled and proud of my masterpiece!
Make the interior of your car
Create a cozy interior for your cardboard car! Start by tracing two circles, one that’s slightly larger than the inside of the car and another to accommodate its exterior. Carefully cut each circle out with scissors before adhering them onto their respective sides of the vehicle using glue. Voila – an instant makeover worthy even in Monopoly money!

Conclusion
Get ready to build the perfect cardboard car with your family – a great way to foster an interest in engineering and problem-solving! All you need is some basic supplies, a bit of imagination and creativity, plus willingness for trial and error. Making memories has never been so fun or easier – let’s get constructing!
Get ready to dive into the incredible world of cardboard car creations, tailored to your skill level! Embrace your inner designer, builder, and driver as you craft the perfect ride. Don’t forget to share your experience and newfound wisdom with those close to you. And remember, our blog is always ready to guide you with more tips and excitement!
Reading suggestions:
